Friday, September 14, 2018

How to Spin and Toss a Rifle

Colorguard is an addition to most marching bands. The reason for colorguard is so that when the marching band goes to competition, they'll be able to score more points for adding a story line to their musical selections. The colorguard's jobs are to make the show look pretty, tell the story, and have fun.


  Learn How to Properly Hold a Rifle

In order for you hold a rifle is pretty weird. You have to know the parts of the rifle there are four main parts to the rifle. There's the Bolt, the nose, the neck, and the butt.


 Learning The Basic Spins

   The basic spins are Drop spins and double time spins depending on who teaches you. There can be many different names for the basics. Drop spins are easier and require a little muscle because they are one handed. To start a drop spin you hold your rifle with the butt to the left and nose to the right. Your right hand should be under the neck, while you left hand should be on top of the nose. After that you push down on the nose with your left hand and quickly put your left hand to your side. Then you flip the rifle around in your right hand as many times as you want until you feel confident doing them.

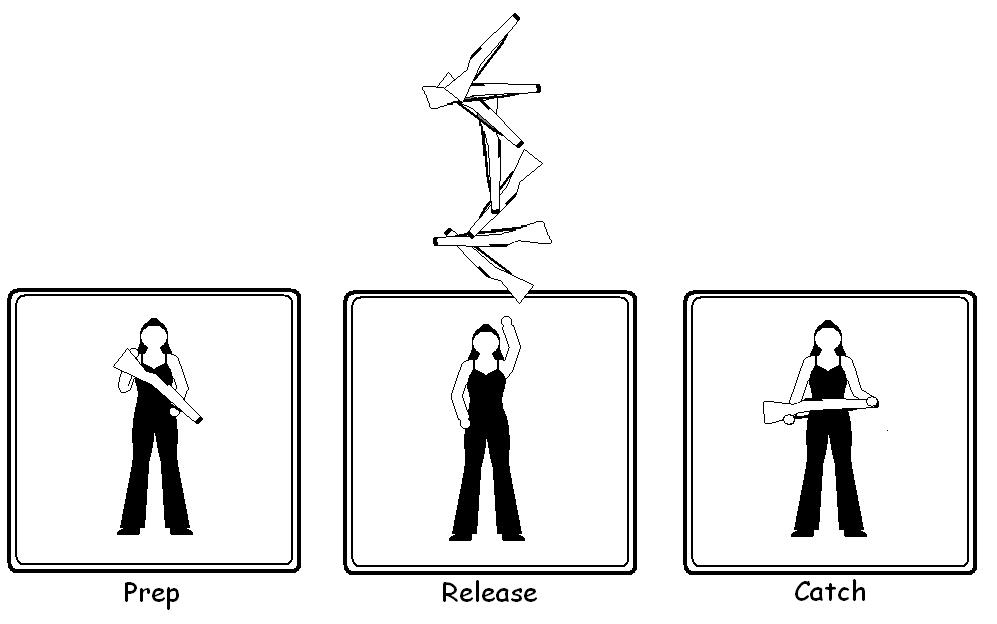
Learning How to Toss A Rifle
 The last thing is learning to toss. Learning to toss is by far the hardest thing ever! It's hard because you have to learn to aim(really, but not really) just so you know 100% that your rifle isn't going to come straight down and hit you in the head. There are three steps to tossing which are similar to drop spins, there's prep which means you're in starting position. There's toss you toss by pushing the nose of the rifle down really hard and while pushing down you're raising your right hand to give your rifle a little extra height then you let go(and hope for the best). Depending on how hard you push and how tall you want it to be you can easily toss a 1-8. Meaning that your rifle will spin making 1 complete circle while going up all the way up to 8 complete circles.


https://static.wixstatic.com/media/18ce043b17652a9594a1e00ac217afa5.wix_mp

https://www.wikihow.com/images/thumb/b/b0/Do-Color-Guard-Step-9.jpg/aid244327-v4-728px-Do-Color-Guard-Step-9.jpg

https://static.wixstatic.com/media/fc753fada1783649f5d77c4e8613c1d1.wix_mp

Proper etiquette in the gym


Going to the gym has slowly becoming one of my favorite hobbies to do whenever I have free time. But every time I workout, I've always notice how some gym members often forget how to properly behave in the gym, or follow the unwritten rules of the gym. There are so many things that people do in the gym where it affected other people simply because of their behavior, so I will only list 4 very important things from my own experiences. Here are 3 things you should and should not do when working out at the gym.


1. Proper attire


When going to the gym, members should have the right clothing when working out. We have all seen far to many people who would wear inappropriate clothes such as jeans, fitted clothes that reveals to much, and/or anything that is not sportswear. Most of these people tend to be either flashy by wearing fitted gym wear to the point where it's got everybody's attention or people who forgot their gym clothes. Either way, other people might find it unsuited for being in the gym. Finding gym wears is very easy to use, just search "Gym Attires" online and a bunch of websites offer proper clothes for you to choose from. What I would recommend for men is a simple and cheap clothing which is a white T-shirt(can be a color at your choosing) and gym shorts with a tennis shoes. For women, a simple T-shirt and either a track shorts or a leggings with tennis shoes. Comfortable and moving freely is really the goal of having an appropriate clothing when going to the gym.


2. Focus on your exercise, not others


If you haven't know, there are people in the gym whose intentions are to attract other people. The gym is a place where people work out to be healthy, achieve a desired physique, and/or de-stress for various reason. The gym is not a dating place to meet cute girls or guys. Trust me, I've seen such situations where a man and women flirting at each other with little to no activity in their workout whatsoever. So to properly work out in the gym without distractions is to simply understand why you have signed up for membership in the first place instead of wasting your time and money. There is a place and time for everything but the gym is for working out. That's it.


3. Clean up your sweat after using the equipment


One of the most important thing for working out in the gym is to be hygienic. In my experiences of going to the gym, I've seen many people who doesn't clean the equipment once they've done their exercise. It is out of respect for others who will be using the equipment right after as well as for a health situation. Sweat can be very dangerous because it has the ability to transmit infections from one person to another. So it is best to wipe your sweat from the equipment and use hand sanitizer before and after workout.


Re-rack your weights!


Last but more importantly, putting back weights after workout has been an issue to many gym goers as there will always have people in the gym who uses the equipment and fail to put it back. Don't be that person. Either these people don't have any respect of others or they're just lazy. Whatever the reason, please, Put. Back. Those. Weights/Equipment. A gym is a place where people share equipment, so with respect from each other, re-rack the equipment for others to use later on. So the next time you work out at the gym and use it's equipment, return it back. There's no harm done if by doing so.


Sources:


Pictures(order of appearance): 

1. Gym

Wednesday, September 12, 2018

How to prepare the perfect Michelada :)


Summer  is about to end, but that doesn't mean the time for  good micheladas is over. Every time is a good time for a michelada. I don't know about you, but every time I go out in the hunt for a michelada I return home with my hopes down... :( it is so hard to find a place where I can drink a decent michelada, so I gave up on my quest to find a good one. I decided I would create my own recipe. I started combining different thinks and watching a bunch of You-tube videos to find the perfect combination... Until I got it!!!!!!!  

I want to share the secret ingredients that make my michelada, The perfect michelada.  

Let's go over the ingredients we are going to need for our perfect Michelada!!!!!

Ingredients:

The Perfect Michelada
  • 1 teaspoon of chili powder (Tajin)
  • 3 teaspoon of kosher salt
  • The juice of one lime 
  • some cubes of ice
  • 1/4 cup of tomato juice (Clamato)
  • Mexican Sauces 
    • Bufalo Sauce
    • Pekin Sauce 
    • Chamoy (not a Sauce)
    • Mexico Lindo Sauce
  • Maggi Juice (Jugo Maggi)


Directions:


  1. Combine the salt and chili powder on a small plate. Rub the lime wedge along the rim of a large lager beer glass, and then dip the rim into the chili salt. Fill the glass with the ice. Pour in the lime juice, tomato juice, pekin sauce, chamoy, bufalo sauce, Mexico lindo sauce, maggi juice and beer. Stir briefly to incorporate. Garnish with the lime wedge.


Very simple to make yet very hard to find the perfect combination of sauces that create a perfect michelada. Is is very important that you use a Corona as your preferred beer.  


WARNING!!!!!!!!!!
                                  DO NOT ABUSE THE USE OF ALCOHOL.
                       IF YOU DRINK DON'T DRIVE.
                                  

Here is a picture with the sauces you need for this recipe. Available at any Latino supermarket.


How to feel confident on a soccer field

In any sport it can be hard to feel confident, mainly for two reasons: It might be the first time you play or after a long break your skills may be gone. In soccer, there are players with years of training or they practice a lot to become better. When is our first time trying a new sport we might it can be overwhelmed and we might quick right away. Or when we start playing again after a long time your skills may be gone and it can make you feel unmotivated. The good news is that there are ways to feel confident in a soccer feel.

1. Practice on your own: 

Practicing soccer on your own can help you gain a comfort level with the ball. After practicing for a while it will make you a better player on the field. The more you practice the more you will become better at having control of the ball and it will help you learn new skills until you start feeling comfortable with the ball which will make you a competitive player. Things that you can practice by yourself are:
  • How to pass the ball, shot or dribble 
  • How to hit the ball from different angles
  • keep control of the ball with your feet and try not to look always at the ball
  • practice on your position to get better at it. 


2. Figure out the problem:

When it's your first time playing soccer it might be frustrated to know what is your weakness. The way to figure it out might which one are your weaknesses is by playing with your friends/ family.


When a player is trying to play soccer again it would be a good idea to play for a couple of times in a team to figure out what skills you need to work on again. For example, if you are a defense and your opponents passes through you and makes a goal, your weakness it will be defending the goal and knowing this can help you practice more and more in a specific weakness.


3. Things that might make you insecure:

When is your first time trying to play soccer or if you want to start playing again it can be difficult due to the lack of belief or confidence. Here are things that might make you insecure:

  • Inner feeling of not been good enough 
  • Negative thought and lack of motivation
  • Low energy level
  • Worrying about a simple thing: Believing that you can't meet or exceed their expectations 
  • Easily intimidated by other player or comment 


These are some basic things that may help you feel confident on a Soccer Field. So don't be afraid and don't let nothing stop you from trying to play. Always keep a positive mentality, practice and keep trying never give up in anything that you are doing.


Reference:
https://www.123rf.com/photo_87816255_stock-vector-child-boy-teen-teenager-standing-frustrated-football-soccer-ball-vector-outlined-illustration-colore.html
https://www.shutterstock.com/image-vector/black-african-american-football-player-pensive-1066305308
https://www.ussportscamps.com/soccer/nike/nike-soccer-camp-william-jessup-university
http://discoversoccer.info/the-importance-of-training-on-your-own/

Three Ways to Adjust a Steel Watch Bracelet


One of the most common bands seen on watches are metal bracelets. The thing that sets this type of band apart from resin straps, rubber starps, and nato straps is the adjustability on the wrist. With non metal straps the wearer can set straps to fit just right, or a snug fit, because of the buckle latch that are seen on belts. With a metal bracelet, the wearer can not do that kind of adjustment because those bracelets use a clasp instead of buckles. This means that the metal bracelet is a little more complicated to get fitted to the proper wrist size.


To adjust the size of the metal band, you must remove the links by pusing out the pins that are holding them in. Some metal bracelets have arrows on the links pointing to direction that the pin must be pushed out of. You must watch out for these markers because you risk getting the pin stuck if you try pushing it in the opposite direction of the arrow. There are three ways to remove the pins and links in order t get the proper fit .


  • Method 1: You could buy a pin remover. This is a tool that aligns with the links and easily pushes them out. The pin remover can be found in watch repair kits or can be bought separately online. It would also be useful to have in case you buy another watch with a metal bracelet. This would allow to swap out links and pins easily, and without frustration from the comfort of your own home.


  • Method 2: the most simple approach to getting a metal bracelet propperly fitted is by having someone else do it for you. Taking your watch to a local watch store that replaces batteries, and does watch repairs should be adequate. If there is not a local watch store, than a major retail store like Macy's would be perfect. This method is the easiest way for you to get your bracelet fitted. This could also get you familiar with a small, local watch store that may have different metal bands to purchase, and gets you in contact with someone that fix your watch if anything were to happen to it.


  • Method 3: the most tedious, but cost effective, approach is using push pins and a small hammer to force the pins out of the links. This is a DIY method that mostly requires two tools, maybe three, and can also be found around the house. Just like the pin removal tool, you will have to align the push pin with the pin inside the link and use the hammer to push the pin out. Most watch pins are easy to push out, so you don't need a lot of force when hitting down with hammer. Also this method requires more attention because you risk damaging the watch or the bracelet if you miss hitting the push pin. This method is great to know because if done right, you won't have to purchase a new tool or drive around looking for a watch store. But if something does go wrong, then you might want to look for a watch repair shop.


This video will provide a better look at methods one and three. That way you have a better idea if what to expect when trying either of these methods to adjust your steel band.


Image/video Credit
s&gs_l=mobile-gws-wiz-img.
https://www.google.com/search?client=tablet-android-samsung&biw=683&bih=512&tbm=isch&sa=1&ei=UCCZW7KcOeLK0PEPj4CSuAE&ins=true&q=watch+links&oq=watch+links&gs_l=mobile-gws-wiz-img.
https://www.google.com/search?client=tablet-android-samsung&biw=683&bih=512&tbm=isch&sa=1&ei=GyKZW562Mp290PEPpp2bkA4&ins=true&q=brick+and+mortar+watch+stores&oq=brick+and+mortar+watch+stores&gs_l=mobile-gws-wiz-img.
https://www.google.com/search?q=macys&client=tablet-android-samsung&source=android-browser&prmd=smniv&source=lnms&tbm=isch&sa=X&ved=0ahUKEwjl_r
https://www.google.com/search?client=tablet-android-samsung&biw=683&bih=512&tbm=isch&sa=1&ei=OCSZW8P_GN3I0PEPi8Cc2A8&ins=true&q=watch+link+removal+push+pin&oq=watch+link+removal+push+pin&gs_l=mobile-gws-wiz-img.


https://youtu.be/o3NfebIjLlU


How To Barbeque


Something that can't be denied, is that people love their food. It's not just that we need food to nourish our bodies and be healthy, but food is just so delicious we would eat it even if we didn't need to. Barbequing your food, is another way of cooking, that will have your food tasting heavenly. If you've never Barbequed before or if you have some experience but just need to brush up on your knowledge, you've come to the right place. This is an overview on the things you need to know before you start barbequing.

Choose Your Grill


When it comes to barbeque grills, there are two main types. These would be charcoal grills and gas grills. Charcoal grills are grills that cook food from burning charcoal briquettes. These grills are known for giving you that amazing smoky, grilled flavor in your food. These grills will definitely give you the best flavor, but calls for prepping the charcoal, lighting it with either lighter fluid or without, depending on the charcoal, and disposing of the charcoal at the end. Gas grills are the more popular type of grill and you see these much more often in the backyards of homes. These grills are powered by propane gas tanks and are popular because of how easy it is to get them fired up. These grills don't take much preparation because they don't need charcoal and the hassle of preheating the grill and disposing of the ashes at the end.

Grab All Necessary Equipment


In order to make sure you’re ready to cook up some mouth-watering food, you should make sure you have all the right tools to do this. You should make sure you have your grill of course and the correct fuel for each, charcoal or propane. Next, you should make sure you have cooking tools like a spatula, some tongs, a basting brush to season your food as they cook if needed, a grill brush to properly clean your grill, and a meat thermometer to make sure your food is properly cooked. After that you can obtain other tools you might need depending on what you are cooking and preference. Anything from grill mits to an apron, are things you might want to grab but is not required.


Clean Your Grill


Unless your grill is brand new, you want to make sure it is clean, to try to make sure you're going to be cooking food that is clean and won't cause you harm from the nasty residue and such from the last cook out, and just because it is kept outside, you never know what kind of stuff is on there. If you are smart and keep your grill


Start Cooking It Up


Now you don’t just automatically start cooking once you either have lit your charcoal or turned on your gas grill, you have to let it heat up. You should wait till the flames have died down and the coals are white and hot before you start cooking, and on a gas grill give it 15 min to get to a suitable temperature.


Proper Cooking Temperatures


The number one thing about cooking raw food like many meats on the barbeque is to make sure that your food is cooked well enough so that it is safe to eat. After cooking your meats for the time required, grab your meat thermometer and stick it inside through the middle and towards the center and check the temperature of it. Ground beef should reach a temperature of 160ºF without any rest time first. Pork and Ham should reach a temperature of 145ºF, but make sure it sits of the flames for 3 minutes before you check the temperature. Turkey and chicken should reach a temperature of 165ºF with no rest time.

Seasoning Your Food


Marinades and basting sauces will burn in the grill temperature is too hot or if exposed to heat for too long. When your marinades and basting sauces burn, you won't get the flavor you were hoping for. It will taste dry and without enough flavor. To avoid this, keep an eye on your food while it on the grill and keep track of cooking times.

Don't Be Afraid to Get Creative


A big part to barbequing is being creative, there are many ways of cooking things on the grill but also many things to cook. When people think of barbequing they think of burgers and hot dogs, and those are both very delicious but there are plenty of other foods that can be grilled. Steaks, ribs, fish, shrimp, vegetables, fruits, potatoes, and even pizza are just some of the things you can throw on the grill and enjoy.


Enjoy That Food!


Flat bike tire? Here's how to fix it yourself (COMPLETE GUIDE)

DISCLAIMER: This is to fix inner tube bike flats, not tubeless tires

Is this your first time having a flat? Second? Tenth? 

Having a flat bike tire is a pain in the butt. It's sudden, unexpected, and ruins your plans (not to mention that you have to go to the shop to get it fixed). Wouldn't it be nice to be able to fix a flat anytime, anywhere? Well know you can! And I'm going to teach you how

1.) Getting the tools

If you're gonna fix a flat, you're gonna need the tools. That means some cash is gonna get spent. However, luckily for you, these tools aren't that expensive. Here's the tools you'll need.


Make sure that you get a wrench that fits the nuts on your wheel properly. If your bike has quick-release levers, disregard the wrench. 
Also, make sure you get the correct size of inner tube. I recommend only getting one but the more the merrier.

2.) Removing the wheel

Now that you have all of the tools, we can get into the first step: removing the wheel that has the flat. I dont really want to get too in depth in this part since the wheel you are removing can vary in difficulty depending on the bike you have. The best advice I can give is to slowly, but surely remove the wheel, while also taking note of how you're removing it.

3.) Fixing the flat

Now that you've removed the wheel, we can get into fixing. 

1st step: Insert tire lever

Insert tire levers into side wall of wheel (where the tire clamps onto the rim)


2nd step: Push them down

Once you've got the levers in, you're going to want to push them down. Make sure you give enough space in between the levers, kinda like how I did in the pic (You can go wider, its just gonna be harder to push down)


3rd step: Take the tire off the wheel

After you pushed them down, remove one of the levers and maintain the other one in the tire. Get a hold of that lever and slowly drag it along the rim of the wheel. Go all around the wheel and you should eventually remove the tire from the wheel. You're only going to remove half of the tire off the wheel, not the entire thing


4th step: Remove the inner tube

Now that you've done that, reach into the tire, grab the inner tube, and pull it out


After you did that, you can go ahead and remove the inner tube and the tire


5th step: Put the tire back on

Now that thats out of the way, go ahead and put the tire back on (I suggest you inspect the tire in order to make sure that there is no spikes or things in it that can potentially make your tire go flat). Put half of the tire all around the wheel, as showed on the pic below


6th step: Install new inner tube

Once you have half the tire on the wheel, get your inner tube and place it inside the wheel. This is easy, just locate the hole where the valve goes into and insert it there. Make sure that you insert the tube in the correct side. Install it on the side where the tire isn't hooked onto.


After doing that, tuck all of the inner tube inside the tire (make sure you dont tangle the inner tube while you're inserting it)


7th step: Clamping the tire

After doing this, tuck the rest of the unhooked tire into the rim of the wheel. 


You may feel that it tends to get harder the closer you get to completley sealing it. If thats the case, you can you use the tire levers to lift the rest of the tire into the rim, just be careful. If you aren't you may slash the inner tube.

8th step: Pump air into the tire

Once you've done that, the wheel is ready to go. All you have to do now is install some air. If you're not sure how much air you need, you can get a gauge (some pumps have one built into it) and measure the PSI. The side of the tire, as well as the inner tubes, should have specs on how much air is needed.


4.) You're all set!

Thats it! You did it! You've successfully fixed a flat, all on you're own. All you have to do now is remember the steps you took in order to get the wheel off and work backwards from there. If you see that you can't get the wheel back on, take wheel off, take air out of the wheel, install it onto the bike again, and put some air into it while its on the bike

I hope you enjoyed this how-to on fixing flat bike tires. Once you've done it, you won't forget it, and since you have all of the required tools, you can fix your flats anytime, anywhere. 


Image links:
- https://images-na.ssl-images-amazon.com/images/I/31ku1tt%2Bj0L.jpg
- https://images.homedepot-static.com/productImages/06c6b203-d02a-40fe-9262-0ecb3e66ced0/svn/super-b-specialty-hand-tools-880009-64_1000.jpg
- https://i1.adis.ws/i/washford/656268?w=637&h=403
- https://images-na.ssl-images-amazon.com/images/I/61RnCFM-SYL._SL1500_.jpg